Raspberry Pi instalation
Prerequisites
- Raspberry Pi 3B, 3B+, 4B
- MicroSD card (recommended SD card size is 32GB and above, as fast as possible)
- Etcher software for flashing download (opens in a new tab)
Installation steps
Download a system image
The latest system image can be found here:
Raspberry Pi 3B, 3B+ - download (opens in a new tab)
Raspberry Pi 4B - download (opens in a new tab)
Writing an image to the SD card
You will need to use an image writing tool to install the image you have downloaded on your SD card.
Etcher is a graphical SD card writing tool that works on Mac OS, Linux and Windows, and is the easiest option for most users. Etcher also supports writing images directly from the zip file, without any unzipping required. To write your image with Etcher:
- Download (opens in a new tab) Etcher and install it.
- Connect an SD card reader with the SD card inside.
- Open Etcher and select from your hard drive the Raspberry Pi .img or .zip file you wish to write to the SD card.
- Select the SD card you wish to write your image to.
- Review your selections and click ‘Flash!’ to begin writing data to the SD card.
Initial Boot
Once it's flashed, plug the SD card into the Raspberry Pi, connect the HDMI, ethernet and power cords. It's important to connect the Raspberry Pi in a proper order, so all components used are safe.
The initial boot is creating system partitions and preparing the environment. It can take a couple of minutes, and the device will reboot multiple times in the process!
After the initial boot, you will see standard signageOS initial page with the Verification hash.
Wi-Fi connection settings
In order to acces the On screen display (OSD) of the Raspberry Pi you will need the PIN code. Actual value depends on registration state of the RPi in CMS:
Unregistred (showing verification hash) - use default PIN (0000)
Registered (showing "Ready for fresh content") - use device specific PIN which you can find on the device detail tab in CMS (Devices -> "Your_device_name" -> PIN)
- Connect a keyboard to the RPi
- Access the RPi OSD Menu by entering device PIN + ENTER (when you are entering the code, you won't see anything on the display)
- In the OSD navigate to Network -> WiFi -> ON
- Set your location
- Wait for the network scan to finish
- Connect to you network
- Press ESC on keyboard to exit the OSD
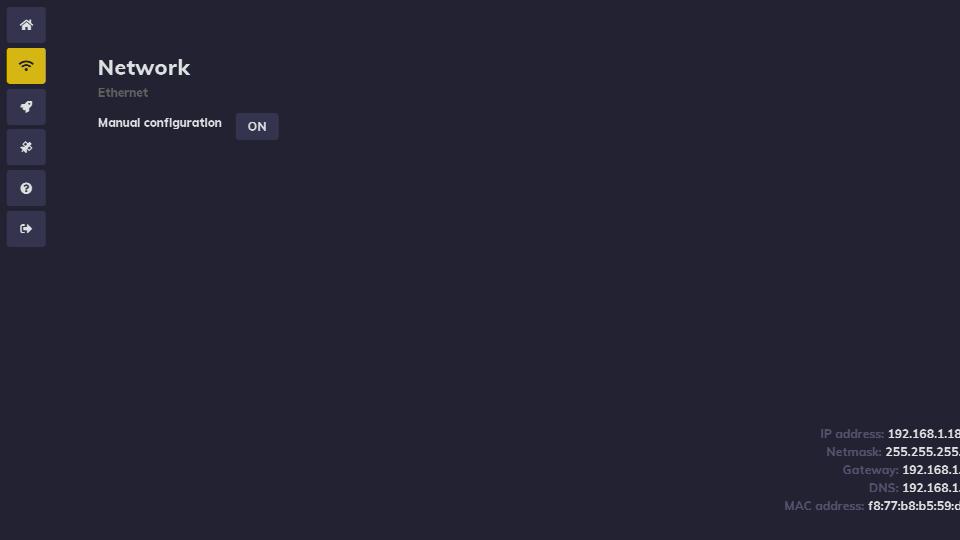
Custom IP settings - no DHCP server network
- Connect a keyboard to the RPi
- Access the RPi OSD Menu by entering device PIN + ENTER (when you are entering the code, you won't see anything on the display)
- In the OSD navigate to Network -> Manual configuration -> ON
- Modify settings to match your network enviroment